The post Gluten Free Christmas Cake appeared first on Food Compass.
]]>This fruit cake is very easy to make and perfect for Christmas and other celebrations. Even fruitcake connoisseurs will never guess that this is not made with traditional wheat flour.
Ingredients
- 125g butter
- ¾ cups dark granulated sugar (brown, muscovado or coconut)
- 1kg mixed dried fruit
- ½ cup sherry
- 1 tsp mixed spice
- zest of 1 orange
- 1 tsp baking soda
- 2 Tbsp liquid sweetener (golden syrup, treacle, coconut nectar, agave nectar)
- 2 eggs
- 150g Natural Evolution Ultimate Gluten Free Baking Flour
- ½ tsp baking powder
Combine first 8 ingredients (butter, sugar, fruit, sherry, spice, zest, baking soda and liquid sweetener) in a saucepan and heat over a medium heat for 2 minutes, stirring often. Allow to cool completely.
Heat oven to 130°C. Grease and line your baking tin, ensuring the paper extends up the sides beyond the tin if you are using a smaller tin. Use a deep 20cm or a regular 30cm tin.
Beat the eggs in a large bowl and add the cooled fruit mixture and stir to combine. Sift the dry ingredients and fold into fruit mixture.
Spoon into the tin and bake for approx 3-3½ hours or until cooked when tested with a skewer.
Buy Banana Flour – Buy Online – Find A Stockist

The post Gluten Free Christmas Cake appeared first on Food Compass.
]]>The post Edmonds Classic Banana Cake with Otto’s Cassava Flour appeared first on Food Compass.
]]>The flavour is unchanged from the original, serve it to your gluten free friends and they would never know, but the texture is moist and wonderfully moorish.
- 125g butter, softened
- ¾ cup sugar
- 2 eggs
- 1 cup mashed bananas
- 1 teaspoon baking soda
- 2 tablespoons hot milk
- 1 cup Otto’s Cassava flour (instead of 2 cups standard flour)
- 1 tsp baking powder
Cream butter and sugar until light and fluffy. Add eggs one at a time, beating well after each addition. Add mashed banana and mix. Stir baking soda into hot milk and add to creamed mixture. Sift flour and baking powder together. Stir into mixture. Turn into a 20cm round cake tin and bake at 180°C until cake springs back when lightly touched and test with a toothpick. Mine was ready after only 25 minutes although recipe says to cook for 50 minutes.
The post Edmonds Classic Banana Cake with Otto’s Cassava Flour appeared first on Food Compass.
]]>The post Resistant Starch appeared first on Food Compass.
]]>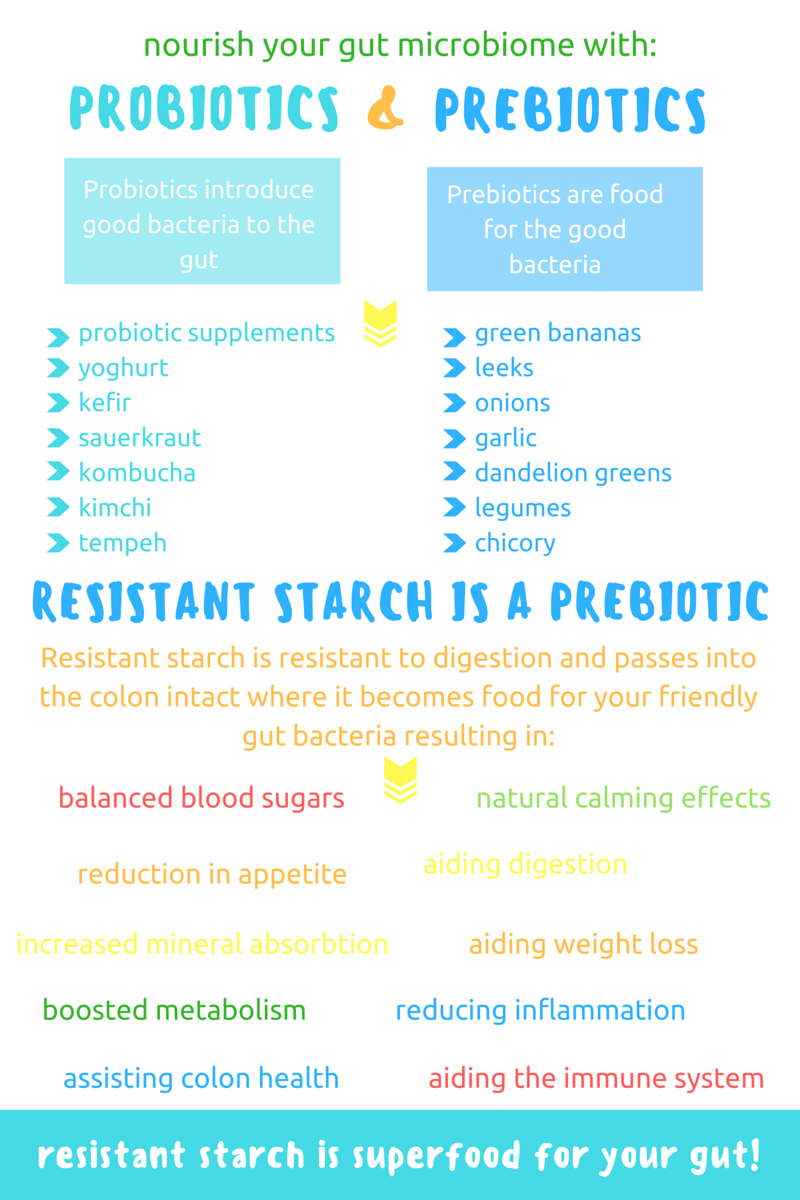
BUY YOUR RESISTANT STARCH AT FOOD COMPASS
The post Resistant Starch appeared first on Food Compass.
]]>The post Gluten Free Chai Crepes appeared first on Food Compass.
]]>Makes 6
Ingredients
- ⅓ cup banana flour – Natural Evolution Foods Ultimate Gluten Free Flour
- 1 Tbsp psyllium husk
- 2 Tbsp tapioca flour
- 1 Tbsp chai spice powder – see below
- Pinch of salt
- 1 egg
- 1 ½ cups milk (approx)
Whisk all the crepe ingredients together then let stand for five minutes to give the psyllium a chance to ‘soak up’ the liquid a little.
Cook on a crepe pan or non stick fry pan over a medium heat.
Chai spice mix
- 1 tsp cardamom
- 1 tsp allspice
- 1 tsp cloves
- 2 tsp cinnamon
- 3 tsp ginger
Mix all together and store leftover spice mix in a small jar or container.
The post Gluten Free Chai Crepes appeared first on Food Compass.
]]>The post Gluten Free Peach Galette appeared first on Food Compass.
]]>Play around with the flavours of the filling to suit, add some cinnamon or nutmeg or seeds from a vanilla pod. Add berries to the fruit or even add a splash of rum.
To help minimise risk of a soggy base sprinkle a thin layer of nut meal over the pastry before adding the fruit, and if you have a pizza stone pop it in the oven on a low rack prior to heating and bake the galette on a rack above the stone.
Ingredients:
- Pastry
- 1 cup Otto’s Cassava Flour
- ¼ cup tapioca or arrowroot flour
- 1 Tbsp icing sugar (optional)
- pinch of salt
- 1 tsp xanthan gum
- 125g cold butter – cut into cubes
- 2 egg yolks
- 1 Tbsp milk
Filling
- 4-5 peaches or other stone fruit – peeled and sliced
- 1 Tbsp lemon juice
- 1 Tbsp tapioca starch
- 1 Tbsp sugar or to taste
- ¼ cup ground nuts (optional)
To make the pastry:
In a food processor add the Cassava flour, tapioca flour, icing sugar, salt and xanthan gum and mix briefly. Add the butter and mix till mixture resembles coarse meal. Add the yolks and milk and mix until dough comes together.
Preheat oven with pizza stone to 200 degrees C.
Combine lemon juice, tapioca starch and sugar then pour over peaches and toss carefully to coat.
Roll out pastry onto baking paper lightly dusted with cassava flour. Carefully slide baking paper with pastry onto a baking sheet.
Spread ground nuts on the pastry within 4cm of the edge. Arrange peach slices over the ground nuts. Pour in remaining juices and fold up the border on the dough.
Bake for 30-40 minutes or until the crust is golden brown.
The post Gluten Free Peach Galette appeared first on Food Compass.
]]>The post Gluten Free Tortillas with Cassava Flour appeared first on Food Compass.
]]>- Three quarters of a cup of Otto’s Cassava Flour
- Quarter teaspoon sea salt
- 2 tablespoons all of oil Olive oil new line
- One third of a cup of warm water
Instructions
- Whisk together the flour and salt. Add the oil and warm water and kneed until the dough is nice and smooth. The dough should not be dry or too wet and sticky.
- Divide into 6 balls
- Roll each dough ball between two pieces of parchment paper until thin. Or use at all tortilla press.
- Heat a dry skillet over medium high heat. Once properly heated place tortilla on skillet. Wait for the air bubbles to form (approximately 1 minute and then flip). Each side should be slightly browned.
- Place tortilla on a plate and cover with a towel to keep warm.
Recipe courtesy of Cara Reed Forkandbeans.com
The post Gluten Free Tortillas with Cassava Flour appeared first on Food Compass.
]]>The post Gluten Free Fruit Loaf appeared first on Food Compass.
]]>Ingredients:
- 1 ½ cups warm water
- 3 Tbsp golden syrup or other liquid sweetener (coconut nectar, maple, honey, agave)
- 2 Tbsp active dry yeast
- 3 eggs
- 2 tsp apple cider vinegar
- 2 Tbsp coconut oil or butter
- 1 ½ cups Natural Evolution Ultimate Gluten Free Banana Flour
- ¼ cup ground flaxseed
- ¼ cup psyllium husk
- 4 tsp baking powder
- 7 tsp mixed spice
- 1 tsp salt
- 1 ½ cups dried fruit
- Grease your loaf pan.
- Mix golden syrup and yeast into the warm water and set aside for 5-15 minutes (it will need longer in cooler seasons) It will begin to look foamy as the yeast starts working.
- In a small bowl whisk together eggs, apple cider vinegar, oil or butter (melted but not hot).
- In a food processor add Banana Flour, flaxseed, psyllium husk, baking powder, mixed spice andsalt). Mix briefly to combine.
- Add the egg mix and the yeast mix to the dry ingredients and blend to combine well. The mixture will look like a thick batter.
- Remove the blade and stir in the dried fruit by hand.
- Put mixture into your loaf pan and smooth the top with a wet spatula or fingers. Place in a warm area to rise for about 30 – 40 minutes. If it is cold you can put it in the hot water cupboard or microwave a wet tea towel for about a minute, then put the loaf pan inside the microwave and close the door. The warm, humid environment can help the bread rise.
- Preheat the oven to 190 degrees Celsius.
Once the loaf has risen to the top or just above the top of the dish, bake for 45 minutes.
Once cooked, let cool in dish for 5 minutes, then turn out to cool completely.
- Paleo ✓ (use coconut oil)
- Raw X
- Vegan X
- Vegetarian ✓
- Low FODMAP ✓ (use coconut nectar or brown rice syrup)
- Refined Sugar Free ✓ (use honey, maple, brown rice, agave)
- Gluten Free ✓
- Nut Free ✓
- Soy Free ✓
- Dairy Free ✓ (use coconut oil)
- Egg Free X
- AIP X
The post Gluten Free Fruit Loaf appeared first on Food Compass.
]]>The post Cacao Dessert Recipe- Cacao & Strawberry Tart appeared first on Food Compass.
]]>Ingredients
Base
1 cup Dates
1 1⁄2 cups of Nuts (almonds, walnuts, or even a blend)
1⁄2 cup of Desiccated Coconut + additional 1/3 cup for lining base
2 Tbsp Cacao Powder
pinch of salt
1⁄3 cup Cacao Butter
Mousse
2 1⁄2 cups raw cashews
1 270mL can of Coconut Cream
5 Tbsp Cacao Powder
3 Tbsp Coconut Nectar (use Agave Nectar or Brown Rice Syrup for Raw)
2 tsp Vanilla Extract
pinch of salt
Strawberries (about 2 punnets)
METHOD
Soak the cashew nuts in water overnight.
Tip: if you haven’t time to soak and you don’t mind the tart not being raw you can simmer the cashews in water for 15-20 minutes to prepare.
Prepare a 22cm springform cake tin by greasing then sprinkling 1⁄3 cup of the dessicated coconut over the base. This will help the tart to slide easily from the base when removed.
Add the dates, nuts and 1⁄2 cup of desiccated coconut, cacao powder and salt to a food processor and process till finely ground.
Gently melt the cacao butter, then add to the food processor and blend again to combine.
Press the base firmly into the tin and up the sides. Place in the fridge to set.
Rinse the food processor then add all the mousse ingredients and blend till smooth. This may take a few minutes. Don’t sweat it if you can’t get it completely smooth, when eaten with the
nutty base you won’t notice any slight graininess in the mousse.
Slice half the the strawberries in half and place in the base. Pour the mousse over and smooth the top. Place in the fridge to set for at least 2 or 3 hours.
Remove from tin by sliding a knife around the sides and sliding on to a plate. Decorate with remaining strawberries, and raw grated chocolate. Serve with whipped coconut cream.
Paleo ✓
Raw ✓
Gluten Free ✓
Vegan ✓
Vegetarian ✓
Low FODMAP X
Refined Sugar Free ✓
Nut Free X
Soy Free ✓
Dairy Free ✓
Egg Free ✓
The post Cacao Dessert Recipe- Cacao & Strawberry Tart appeared first on Food Compass.
]]>The post Dairy Free Custard Recipe appeared first on Food Compass.
]]>Making your own custard gives you the freedom to use quality ingredients, and use the type of sweetener, and the amount that is right for you and your family. For an easy dessert, whip up a batch of Hunter Gatherer Gourmet muffins and serve warm with custard.
Makes 2 cups
- 2 cups (500ml) almond milk
- 2 eggs
- 1 vanilla pod
- Stevia or your choice of sweetener
- 1 Tbsp tapioca flour/starch (add an extra ½ Tbsp if you like a thicker custard)
- nutmeg
Putting It All Together
Add almond milk and vanilla pod to a saucepan.
Heat until almost boiling. Remove from heat, scrape seeds from vanilla pod and add to milk, remove seed pod.
Whisk eggs, sweetener and tapioca flour in a bowl.
Pour hot milk over the eggs while whisking.
Transfer back to the saucepan and heat until custard has thickened and coats the back of a spoon.
Grate a little nutmeg over the top before serving.
The post Dairy Free Custard Recipe appeared first on Food Compass.
]]>The post Tumeric Recipe For A Home Made Healthy Fizzy Drink appeared first on Food Compass.
]]>This is a very easy fermented tonic to make using the same methods used to make ginger beer. A great one to have on hand during winter to help ward of colds, or as a daily tonic for those with inflammatory problems like rheumatoid arthritis, ulcerative colitis, crohn’s disease or chronic sinusitis. If you like ginger beer then you are going to love the taste of this healthy fizzy drink recipe.
What are the health benefits of turmeric?
Turmeric contains a compound called curcumin which has shown to have anti-inflammatory, antioxidant, antiproliferative (inhibits cancer cell growth) effects. The bioavailability or ability for the body to absorb curcumin can be enhanced by fermentation, leading to a more potent tonic.
Why ginger?
Ginger is a powerful anti-inflammatory and also a well known remedy for indigestion, colds and flu and in particular nausea. Not to mention, it just tastes fantastic!
Why Tulsi?
Tulsi is a herb also known as Holy Basil. It has been used in India for more than 5000 years and revered as the sacred ‘Queen of Herbs’, prized for its healing power and used in traditional Ayurvedic and Chinese herbal medicines. Tulsi is an adaptogenic herb, supporting the body’s immune system and helping us to adapt to environmental, physical and emotional stressors. In India Tulsi is still grown in an earthenware pot in many family homes and gardens, and used to make a refreshing and health promoting tea.
Tumeric recipe for the ultimate home made healthy fizzy drink
The first step involves making a ginger/turmeric ‘bug’. The bug is simply a slurry of ginger, turmeric, sugar and water. Left for a few days the bug starts to bubble and foam due to the naturally occurring yeasts and bacteria feeding on the sugar. Once the bug is ready the tonic is made, the bug added and then bottled and left to further ferment for a few days before drinking. Make sure you read the tips at the end of the recipe before you take on the project, as there are important notes on ingredients and equipment.
You will need:
- Fresh turmeric root (organic if possible)
- Fresh ginger root (organic if possible)
- Organic sugar – Rapadura or Panela
- Spring water
- Glass jar
- Bottles
Step 1. To make the ‘bug’:
To a jar add 1 Tbsp each of fresh grated Turmeric root, and Ginger root.
2 Tbsp spring water
1 Tbsp organic sugar Rapadura or Panela
Stir and cover with a muslin cloth or even paper towel to keep out dust and bugs and place out of direct sunlight.
Each day add an additional 1 Tbsp each of Turmeric and Ginger, 2 Tbsp of water and 1 Tbsp of sugar and give a stir once or twice a day. Once bubbles start to form a the surface the bug is ready to use. This will take usually between 3- 7 days. Temperature is usually the biggest factor in time to ferment with warmth speeding up the process. In winter you may need to keep in the hot water cupboard.
Once the bug is bubbling, you can prepare the tonic.
Step 2. To make the tonic (makes 1 litre, multiply as needed):
Add 1 litre of spring water, 1-2 Tbsp each of grated Turmeric and Ginger to a saucepan and boil for 15 minutes. Remove from heat and add 2 Tulsi tea bags to the saucepan and leave to cool to room temperature.
Once cool add the juice of 2 lemons and either ¼ cup of sugar, or 1 scoop of Ecobloom. If you prefer a sweeter tonic, feel free to add more sugar as the yeast and bacteria will continue to feed off the sugar. Use Ecobloom if you prefer to avoid sugar.
Add ¼ cup of the ‘bug’ to the tonic and stir to combine.
Strain and bottle and leave at room temperature for about 3 days, then move to the refrigerator.
You can continue to use your bug, just replace the ¼ cup you used with ¼ cup of water and 2 Tbsp of sugar and continue to feed daily, or place in the fridge and feed weekly.
Notes and tips:
- Whenever possible use organic roots to make the tonic but if you can’t get organic, just peel the roots before grating. No need to peel if you’ve got organic roots.
- Turmeric may stain your skin and some surfaces yellow.
- Organic and unrefined sugar contains minerals that help feed the yeasts and bacteria and help produce a better ferment.
- Chlorine or fluoride can negatively affect your ferment so best to use spring or mineral water.
- Use nonreactive cookware and utensils to prepare and store fermented foods and drink. Stainless steel, ceramic, glass, and plastic are ok. Avoid aluminium, cast iron and copper. You can use wooden spoons, but they will stain yellow from the turmeric.
- Good glass flip-top bottles can be sourced from home brew suppliers and are superior quality.
- Temperature affects fermentation times, both of the bug, and the bottled tonic. In winter you may need to use the hot water cupboard, and in summer fermentation may happen very quickly.
- Fermentation will continue even when refrigerated, but just at a much slower rate.
- When bottled the tonic may carbonate and get fizzy. Glass bottles can explode so are best kept in a safe place away from areas where children are. You can wrap in a tea towel in the fridge if you have concerns, or ‘burp’ the bottle daily to release the gas. Refrigerate before opening, and open carefully over the sink in case of over fizzyness.
- Sometimes the bug doesn’t develop any bubbles. There can be many reasons for this. Non organic roots can affect fermentation or using roots stored in the fridge or freezer, water or sugar quality. Sometimes it just takes a little longer than expected, and sometimes it just doesn’t happen at all even when you did everything right. Yeasts and bacteria are funny critters and unpredictable and sometimes they just don’t show up to the party.
- Honey may be used instead of sugar, but due to the antibacterial properties in honey this can affect the ferment either inhibiting or slowing down the activity. Many people successfully use honey, so feel free to experiment.
The post Tumeric Recipe For A Home Made Healthy Fizzy Drink appeared first on Food Compass.
]]>